11 February 2017

Antor Slide & Negative Copier/Duplicator Review.

Antor Slide & Negative Copier/Duplicator Review.

Price: $66.87 + Postage. It can be found here in my online The Film Bloke Store.

I've had a couple of these Duplicator/Copiers in stock for a while, and I thought I'd review them myself. My own neg copy setup is dismantled at the moment so this was a good time to do the review.

Digital Copier Slide/Film Negative Duplicator, Mounts to DSLR


Before I start, I don't use a scanner to digitise my negs, except for one period some years ago where I used a Plustek scanner on some old family negs, which I found very good, but slow.

I prefer the DSLR method because I find it faster and gives me good resolution, and the bonus is, I already own all the stuff I needed, so there was no incentive to buy anything else. I understand this option won't work for everyone, our needs vary. I'm not going to enter into arguments about which is better - do whatever feels good (but not so much as to go blind).

The duplicator option will suit people that don't do huge volumes of 35mm and don't want to spend the many, many hard bucks on a bespoke Scanner.

The Copier comprises a tube with a 52mm female thread at the camera end to attach to a lens of your choosing via step up/down adapter rings, which are not supplied. I used the M42 Takumar 50mm f4 macro. The neg holder and diffuser are at the business end. 

I'ts best to use a lens with it where the front element doesn't rotate during focusing.

The copier has a front optic, presumably to narrow the lens' field of view. I generally don't like non-lens maker's glass in budget adapters or attachments, they are not as good as the glass in most lenses, so I wanted to see how it affected clarity and resolution.

To use, it is quick and simple. Blow the dust/hair/crud off the neg, insert it into the carrier by just sliding it in, point at at the sky or something bright to focus. You could just take a shot at this stage, but I decided to use a flash bounced off a white wall to light the negs. I find it gives better contrast.

Slides are copied by removing the little neg holder which just pulls out of the top, and slide your slide in (pun) to take the place of the neg holder.

It's best to forget automation when duplicating, use manual focus, exposure and flash output if you can. In my case I set the aperture to f11, shutter to 1/125s, ISO to 100, the 40GN flash was set at ¼ power, at a distance of 1 metre from a white wall.

The film I used was Rollei RPX 100 35mm in a Bessa-R and with a Canon 35mm LTM lens.
The DSLR I used for the copy is a Canon 760D 24mp, 6000x4000 image, shot in RAW.

Negs were developed in Rodinal 1+25 for 9 minutes with a couple of gentle agitations every minute.

As with most modern emulsions, the contrast in the RPX seems to be a bit lacking but was easily corrected in PS using the Curves tool in Camera Raw.

As expected there was softness in the corners of the digitised negs, the centre was acceptable for a budget copier, and overall the outcome was ok to post online or make moderate size prints from, probably no bigger than 8x10. I think the results were superior to the el-cheapo 5mp copiers that proliferate ebay, they don't have the benefit of a good DSLR sensor and a Macro lens.

 I found the duplicator very fast to use, much faster than my own cobbled together Frankencopier. Mainly because once focus was achieved, you could pretty much just feed the frames through, fire, and move on.

I will soon have in stock a  different type of Neg copier, which I will also review when it arrives, the new duplicator one has no optics of it's own and will copy negs from 35 mm to 6x7. Basically it's a multi format neg holder with rails attached by a plate to the tripod mount on the camera, and use whatever lens you have that suits best, with or without extension tubes.

To look at the Duplicator and more example images in detail, follow this link to my flickr album, which allows much greater resolution, just click on the images to enlarge.

To Summarise.

Pros:
Fast
Small
Cheap
Lightweight
Fits most lenses with an adapter ring.
Output fine for posting online or making medium size prints.

Cons:
Not as sharp as most lenses.
Soft in the corners
No good for giant prints
No good for commercial work


27 August 2016

Photographic Film - Developing minus the mystery and confusion.

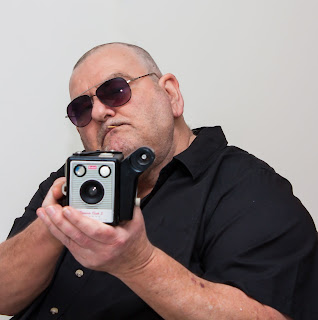
I'm an old Film Photographer, with emphasis on the 'old'.

I also have an Online Store, 'The Film Bloke' - catering to the needs of Film Shooters and Darkroom workers.

This article is for people interested in developing their first film.

First of all let me say I'm not "the" expert in this field and I'm not going to teach you how to make 'fine art' quality negs and prints, (because I don't know how),  but I have been doing this for many years and it's not as complicated as you may be led to believe  by stories on the Internet. (That's Irony).

Everyone has their own idea about how to do things (including me) and it leads to confusion if you are new at it. Ask a thousand photographers how to shoot and process film,  and you'll get a thousand different answers.

My aim is to tell you how to make a decent garden variety negative and avoid common mistakes. There is a summary at the end of the article of do's and don'ts.

If you are just starting out with film,  the rule of thumb is K.I.S.S.

Throughout the article, the film I'm referring to will be 35mm and black and white unless otherwise stated.

To start,  shoot one type of film, use one type of developer/stop bath/fixer and one technique. The idea is to reduce as many variables as possible,  and if something goes wrong, it's much easier to troubleshoot. You can get adventurous later once you have the basics nailed.

Shooting:
Meter your shot as usual, if in doubt, over expose rather than underexpose, film handles highlights well and you will have a less grainy shot.

Unloading the Camera:
When the roll of film is finished, press the release button usually under the camera and start to wind the film back into the cassette in a clockwise direction. Do this slowly and feel for a sudden 'release' and the re-winding will become easier. At this point stop winding, open the back in subdued light and remove the film leaving the leader sticking out of the cassette by 2-3 cms.

Leaving the leader stick out will make the next step much easier.

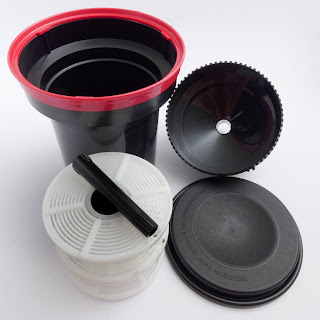
Loading film onto a developing tank reel:
This part requires practice in daylight on an old roll, or use an "Easy Load Reel" that I sell in my store and also use myself for Medium Format Film like 120.

For this step you will need:
Film Change Bag or a Darkroom
Bottle opener,
Pair of small scissors
Developing Tank and Reel(s)
Some patience.

For those of you without any basic gear, I sell a ready to go B&W developing Starter Kit in my The Film Bloke Store, complete with chemicals.

I started to write the instructions for loading the reel, but it's much easier to watch a youtube video.

This video shows this happening in a darkroom, but the procedure is the same for a change bag.

Once the film is loaded and the developing tank is closed up and light-tight, remove the tank from the change bag and over to the developing area, usually known as the 'wet area'.


Prepare your chemical stock solutions:
Many developers, stop baths, fixers come in a concentrated solution and need to be mixed with water at a certain ratio to make what is called a 'stock' solution - some do not.

Often this 'stock' solution is further diluted with water to make your 'working' solutions, especially in the case of many developers like Kodak D76 or Ilford ID11.

The working solutions are what you will use to process your films. Read the instruction sheets with your chemicals carefully to determine how they are used, they are not all the same.

The chemicals in general are fairly safe, as long as you don't bathe in,  or drink them. Just use common sense and keep it off your skin as much as possible and work in a ventilated area.


For the development step you will need:
3 Jugs with a 600ml capacity, and with graduations and labelled 'developer', 'stop bath', 'fixer'
1 Funnel
1 Thermometer, needs to be accurate within half a degree or so.
1 Timer capable of minutes/seconds (smart phone is good).
Developer of choice.
Stop bath of choice.
Fixer of choice.
Wetting agent.
Squeegee or new soft damp sponge.

Note for chemicals:
Developer temperature is important, the temperature of the rest of the liquids including the wash water should be within a few degrees of the developer temperature, or else you may end up with what's called 'reticulation' in your negative (a bunch of cracks in the emulsion). You can also do this on purpose for effect if you want.

For developer, I'm going to suggest a 'one shot' type like Rodinal, Adonal or R09 which simply means it's not re-used, and it has a huge shelf life, years in fact and is very economical.

Mix your Rodinal or any other Developer with water at 20 degrees C, usual ratio is 1+25 or 1+50.
Check the development time for your film/developer combination and set your timer for that time. In this case, the time for 1+25 is 9 minutes at 20C.

(You can use the above 'development time' link for any combination of film/developer, just type the details in the top left corner of the page).

Line up your three jugs on the bench from left to right in the order of Developer>Stop Bath>fixer. Add the chemicals to these jugs, make sure temperature for developer is 20 degrees C and the rest of the chemicals within a few degrees of that.


Develop!
Add the developer to the Developing tank, pouring slowly into your tank, holding the tank at an angle toward the jug to minimise splashing and creating bubbles.
Tap the tank bottom on the bench a couple of times to dislodge air bubbles (there won't be any if you poured the dev in slowly).
Then agitate the tank gently by inverting or 'twiddling' the agitation stick slowly for 5 seconds/per minute of developing time. I find 'twiddling more convenient than inversion.

(I rinse with water between steps to reduce carry-over of chemicals from one step to the next, it isn't necessary, but helps preserve the life of the stop bath and fixer and only takes a few more seconds. What can I say? I'm a tight arse.).

Stop Bath:
When there is about 15 seconds to go with dev time, tip your developer down the sink or into a receptacle, run some tap water in the tank and swirl to wash out any remaining developer, drain and add the stop bath. Agitate gently for 30 seconds, pour back into your stop bath bottle or jug for reuse. (Many stop baths have an 'indicator' and change colour when exhausted).

Fixer:
Run water into the tank again for a minute, swirl and drain, add the fixer and  Agitate as for developing, but for the time indicated for fresh fixer, usually around 5-6 minutes.  Pour used fixer back into the bottle for re-use.

A thing to note with fixers is that even though they are reusable, their effect weakens with use and a 'clearing test' needs to be done to determine the correct fixing time. Neither under or over fixing is a good idea, they will both affect the quality or preservation of the negative.

Final Wash:
After the fixer has been poured back into it's jug or bottle, remove the lid of the developing tank and start running tap water into the tank at a slow but steady stream for around 10 minutes. At the end of that time, turn off the water and put about 3-4 drops of wetting agent into the tank.
(don't use household detergents, they have fragrances and other additives that may damage your negs).
Gently 'twiddle' the loaded film reels in the wetted water, try not to excessively foam the water up.
(Wetting agent helps film to dry evenly and reduce the chances of water marks from minerals in the water)

Drying the Negatives:
Remove a film reel from the tank, shake off excess water by 'flicking' it into the sink. Twist the two sides of the reel in opposite directions while holding the reel horizontally.

Lift off the top half of the reel and grab the outer end of the film, being careful not to touch the emulsion or image area with your fingers.

I find it easiest to grab the film by the edges between thumb and forefinger somewhere near the middle and hang it in a inverted 'U' shape. Grab the clean squeegee or sponge, dip it in the tank of wetted water, shake or squeeze out excess water and with a single stroke, squeegee one half of the film, then repeat on the other hanging half.

(Some people will advise you to avoid squeegees like the plague, saying that they scratch the film. My contention is that they will only scratch the film if they have crap on them - keep your tools clean and you will never have a problem. It is best to get the film dry as soon as possible by squeegeeing away the excess moisture, because once dust gets embedded in the soft emulsion, you will never remove it.)


Attach a weighted film clip to one end, and a normal clip at the other,  I sell them in sets in my Store The weighted clip should be at the bottom to encourage the film to dry without curling.

Now to hang your films in a dust free environment to dry.
I found the best place to dry them is in the bathroom inside the shower recess, just put a rod across the top of the stall and a bit of wire or something to make a hook and close the shower recess door.
Under normal circumstances 2-3 hours is long enough to dry the film, but longer on cold wet days.
Obviously try and choose a time when the shower recess isn't likely to be used.

Storage and Archiving:

Once your film is dry, it's time to put them in negative sleeves. The acid free acetate ones are convenient because they are transparent, but they aren't as well suited for keeping your negs in a pristine state.


A paper based material known as Glassine is far better, because it will absorb dampness in the environment and thereby discourage the growth of mold.

Normally the negs are cut into lengths of 5 or 6 frames, depending on what sleeves you have. Do not handle the negs with your fingers on the image area, they are virtually impossible to remove from the emulsion due to acid and oils in your skin and will ruin your image.
Use either cotton gloves,  or become adept at handling them only by the edges.


Summary of do's and don'ts when shooting and processing film.

Don't tell your Wife/Partner/Significant other that you are converting the Bathroom into a Darkroom - They will punch you in the face. Ask them nicely.

Do Load and unload film in your camera in subdued light or at least not in bright sunlight.
Do not store your camera or film in a hot car in summer, the film will object strongly.
Do try and leave the film leader sticking out of the roll at the end of your shoot.

Darkroom means Dark! 
If you have prepared a room as a darkroom, spend at least 5 minutes in it in total darkness to check for light tightness, and you will be amazed at how bright it becomes in there.

Do load exposed film onto your reels either in the above darkroom or a film change bag in subdued light. In a pinch I have loaded films onto reels in a normally dark bedroom, under about 3 or 4 heavy blankets.

Do be clean, consistent and accurate in your time, agitations, temperatures and measurements when processing.

Do clean and dry all your gear and store in a dust free place until next use. Experiment by all means, but try to change only one variable at a time in your work, it will be much easier to trouble shoot if things go belly up.

Do not handle film with your fingers in the image area, a guaranteed way to kill your negatives.

Do invest in a Giottos Rocket Blaster or a  Hurricane Canless Air System - Dust and hair is the enemy of film (unless you like spending hours spotting). I have not had to spot a single neg since I bought mine.


Now that you've done that, he next step is to either make wet prints the traditional way, print by using an inkjet printer or just digitise them for the Web.

Much more fun to be had yet.....


01 September 2015

Make your own reloadable 35mm Film Cassettes, D.I.Y

Turning your old used 35mm film cassettes into re-loadable ones without a lot of fuss.

I bought a bulk film loader and 5 re-loadable plastic cassettes some time ago and I recently started bulk loading film.

I duly loaded my 5 available cassettes with some Kodak Hawkeye 2485 black and white surveillance film the other day and put them in the fridge. This left me no spare empty cassettes.

I had a look at some used Ilford fp4 plus cassettes I had kept (I'm a magpie) and had a go and dismantling one without killing it in the process.

It doesn't matter what brand of cassette you use, but make sure it's not one of those that has several scalloped crimps around the edge like a beer bottle top or ravioli, but a single smooth uniform crimp around the circumference making it an interference fit.

You should also ensure the cassette hasn't been kept somewhere where it may have been subjected to dirt and grit that may work it's way into the felt seal and scratch the crap out of your film.


Step 1
Grab the cassette in your fist tightly as in the illustration, keeping your knuckles as far from the top as you can. (you'll see why later).


Step 2
Take a long and relatively heavy flat object something like the bottle opener in the picture, and taking care to keep it square to the film cassette, bash the protruding spool centre a number of times until it forces off the lower cassette cap, which is lightly crimped on. During this process you will bash your knuckles a few times, but that's a small price to pay for free reloadable cassettes :)


Step 3

Your dismantled cassette will now look like this:


Step 4

Take a small flat bladed screwdriver that will fit into the crimp groove in the lower lid as shown. Gently lever slightly outward from the centre all around and evenly, just to relieve the tension enough to be able to refit the cap onto the lower end of the spool with a little resistance - it's easy, mine worked first shot.

(you can hold it anyway you like, I had to hold the camera  and the screwdriver and I only have two hands)


Job done.


Store your finished cassette in a sealed plastic bag to keep it free from dust and grit.

If you feel a bit insecure about pushing a cap back on to your newly loaded cassette and want some added security, put a dab of tape from the edge of the cap to the cassette.

The reusable cassettes that I purchased had plastic bayonet fit caps, and are not very secure either, it only takes a slight anti clockwise twist for the cap to come off, so I taped mine on too.

Have fun and may your knuckles heal quickly :)


27 July 2015

Fujifilm X-E1 modified, and a renewed friendship


You may recall recently I whined about my then new Fujifilm X-E1 for a number of reasons. 

But in spite of that, it had many of the features I wanted in a camera, dedicated large knobs for shutter speed, aperture and exposure compensation and a quiet shutter. An ISO knob would have been handy but I can live without it.

I have also been trying to make a street shooting rig out of one of my cameras, and decided the Fuji would do the best job, because it has Auto ISO and the upper and lower range can be specified and set. 

I think this is a great feature because I can set the shutter speed and aperture I want and let the camera do it's thing, or I can just go back to fully manual if I want.

The Fuji has a horrible front grip which caused my fat fingers to mash other buttons on the rear unintentionally, so I added a 3rd party grip, which is made of an aluminium alloy and is consequently light,  which I'm very happy with. 


The EVF eyecup is non existent from the point of view of shading external light from my eyes, so I bought a generic multiple eyecup set from ebay for very little money and rigged it to fit over the existing eyecup. That problem is now solved and shooting toward the sun is no longer impeded by stray bright light that washes out the EVF image.


I also wanted a 35mm (equivalent) manual lens and settled on an available (on ebay)  Nikon mount Sigma Super – Wide II 1:2.8 f=24mm Multi Coated FX which is one of their better lenses of the era. This focal length lens is not so wide as to distort, but wide enough for accurate zone focusing and a goodly angle of view.


The camera was ready to go, so I took it out on an outing and found all my shots were 'leaning' to the right, because I 'shoot from the hip' which is my preferred method. (I shoot this way because I want the subject to be natural and unposed, and also nowadays people can react with suspicion and/or violence when a camera is aimed in their direction. It's just easier). 

I was managing to get the subject where I wanted them in the frame, but my judgement of levelling on two planes was sucky to say the least. I bought a little hot shoe mounted circular spirit level and tried it out this afternoon, it works great and my shots are level once more.

So, Fujifilm X-E1, I forgive you for your past sins and accept that we aren't all perfect.

Amen.


07 June 2015

A tale of two cameras

I had decided some months ago to downsize my gear and go mirrorless. I'm getting older and slower, the gear is getting heavier, and the images resulting from my hobby are only ever posted online, so I don't need billions of pixels.

The other thing is that I have a bunch of good legacy lenses from my collection of iconic film gear at my disposal, which play nicely with mirrorless. Pentax in particular made some amazing quality glass, compact and lightweight to boot.

So, I started out by selling my Canon 5D Mk II and the EF 24-105 f4 L IS USM, and bought a Sony NEX-6 with the 16-50mm kit lens, which is a fair performer.

The only thing I didn't like about the NEX are the little fiddly wheels and buttons found on compact cameras, and the horrible menu system.
Fortunately the 'quick menu' can be left on screen and most of the common controls can be accessed there.

The Sony felt good in the hand though, it was comfortable, light and compact to hold and did a good job for me. It is a pleasure to use and I really like it's 'Auto Dynamic Range Optimisation' function. It does a great job of calculating correct exposure for shadow and highlight detail in the most extreme shots.

But then the grass on the other side looked a bit greener.....

I saw a review for the Fujifilm X-E1. It was a slightly larger mirrorless camera in the retro style of a blocky rangefinder. It had proper large dedicated knobs and levers, just like the SLRs I was brought up with in the '80s, no poking around in menus to change settings.


No PASM, just ISO, shutter speed, Exposure compensation knobs and an (unmarked) aperture ring, nothing to get in the way of taking pictures.

I read all the reviews and decided this was my main camera from now on. It would be made complete with my old lenses that had real mechanical aperture rings on them.

I used the X-E1 a lot and tried very hard to like it, but I always liked the little NEX more. The X-E1 is a very capable camera, but it didn't live up to the image I had in mind when I bought it.

First of all, the thing is horrible to grip. It does have a finger grip of sorts on the front, but on the rear, the little indent for the thumb also put my giant digit on top of the easily turned exposure compensation dial,  and the heel of my thumb would randomly mash other buttons on the direction dial and things would happen that shouldn't happen, like changes to shutter speed and switching to macro mode unintentionally.

I know I always have my current settings visible in the viewfinder, but once I set up my exposure, I don't want to have to recheck it constantly between shots.

I bought a little after market thumb grip thing that slips into the hot shoe to improve handling, but that just got in the way of the shutter speed dial and didn't do much for the grip anyway.

I have since ordered another full body grip (below) which should make the camera easier to hold and may also alleviate the accidental operation of buttons etc, but at the cost of some added size and weight.

The on/off switch takes only the softest touch to turn the camera on, and I'm constantly finding the bloody thing turned on or off when I'm expecting the opposite. Similarly, the exposure compensation knob is also easily moved.

The unmarked and 'wired' electronic aperture ring was also not really satisfying. I wanted to be able to set the aperture ring to an index mark as with the shutter speed, but a peek into the viewfinder or lcd screen was required to determine what the aperture was set to.

The straw that broke the proverbial Camel's back was the poor implementation of assisted manual focus. It has a button to magnify the image, but that isn't always helpful for a quick shot, especially with longer lenses.
It has Fuji's version of 'focus peaking' which outlines the subject edge in (faintly) glowing pixels to indicate focus, but the effect is so difficult to see, it may as well not be there. This was what I hated most, because I really wanted to use my manual lenses with this camera to make the 'totally manual' experience complete.

Ironically, the Sony NEX-6 has absolutely brilliant assisted manual focus, it too can magnify the image, but the focus peaking feature is bright and clear. It was more than just good assisted manual focus, it is also the best depth of field preview I have ever seen.

As the aperture ring is turned, parts of the scene that are in focus are highlighted brightly and it's only a matter turning the ring until you have the exact focus point and depth of field that is required for the shot.

Anyone that has used the old stop down depth of field preview lever on an SLR or DSLR and viewed the dim resulting image in the viewfinder will greatly appreciate the Sony's bright focus peaking DOF preview.

I have no intention of getting rid of the Fujifilm X-E1 just yet and I am getting used to it's foibles. I'll wait until the new grip arrives,  and I want another body anyway to save the hassle of changing and juggling lenses while out shooting.

Two mirrorless cameras are still probably lighter than one full frame DSLR and lens.

I'll probably use the Fuji a fair bit, I have an 18-55 and an 18-135 lens for it which cover most of my needs and I'll keep the Sony to carry my manual lenses, like my 8mm fish and a 14mm Samyang.

But the lenses I most want to use on the Sony are my Super Takumar 50mm f4, a wonderful Super Multi - Coated Takumar 1:2.5/135, the Helios-44-2 2/58 and it's brilliant bokeh, along with the renowned Russian portrait lens, the M42 Jupiter 9/85 f2.

Beware of the greener grass, it generally isn't.

I'm also coming to realise that there is no such thing as a 'perfect' camera.


27 January 2015

Image Evaluation without the mind games.

Have you ever found yourself post processing an image for a long time, adjusting colour, tone, cropping, exposure, contrast until you were happy with the finished product, only to find once you upload/print it, or come back to it later, the very thing you were trying to fix was out of whack?

Now I'm not talking about total accuracy or monitor calibration or any of that. I'm speaking subjectively, to get the image to appear to me the way I want it, not some software's idea of what's 'correct'.

It happened to me all the time, I was forever having to readjust the images after I thought I was finished with them.

The mind plays tricks on us. If we look at something long enough, it 'becomes' what we wanted it to be in our mind. But on looking at it again later. when you've had a break, it doesn't look like what you wanted at all.

I found something that helps to neutrally evaluate the image without the preconception from staring at it for a long time.

The last step in my post processing now is to close my eyes for 10 seconds or so and clear my mind (which isn't hard, not much going on in there), make the image full screen on my monitor so that there are no other distractions around the periphery to interfere with my judgement and then open them to view the image.

Generally, the first impression I get when opening my eyes is the most accurate, and not influenced by any ingrained expectation I may have had of it.

20 January 2015

Work flow and post processing images in Adobe Lightroom.


Comprehending:
When I first met Lightroom a few years ago, I really didn't like it. I couldn't get my head around the concept of it's folder management and the way it didn't like files or folders being moved and tampered with in the OS. I was expecting it to act more like Adobe Bridge or  Windows Explorer, and I didn't know about having to export the image to make the editing changes permanent.

Yes - I am a dummkopf.

But I relented, bit the bullet and R.T.F.M. 
I then understood that it's basically a very efficient database management system that stores not only file and folder locations, but every detail of the 'virtual' editing done on the files themselves, along with the exif data of the shots, and just as importantly, a great image editor.

No wonder it got pissed off at me when I screwed with the database index by moving files and folders without telling it.

Peace:
I have come to use it for 95% of all my processing and image cataloging without a hiccup, and have learned more about it's likes and dislikes, as well as using some of it's features in ways unintended by Adobe. We are now good old friends.

Now to workflow, bearing in mind I'm an amateur photog and this may not suit everyone, but it suits me fine.

Importing:

Keywording:
I keyword everything, and I do it on import, it's quick, easy and invaluable for finding the picture or pictures you want quickly among tens of thousands of images.

A tip on key wording - use words, not strings of words as keywords or your keyword list will become a horrendous mess and hinder the search for your image later. It will also slow down the act of keywording itself while it tries to find a stored match for the keyword being typed.

I don't laboriously keyword each image individually anymore, I keyword the entire import group. For example if some of the images depict pets, some people and others food etc, I just add all the keywords to every image in the import. Some keywords won't necessarily apply to all the images imported, so I tend to get multiple hits for a keyword search, but I don't find that a problem for my purposes, I still end up finding the image I want, albeit a bit slower.

I also found that place names are often good to include along with the rest of the keywords relating to a subject. I can nearly always recall where a particular image of someone or something was taken, senility notwithstanding, but I rarely remember when or how.

Folders:
I arrange my general image folders by year, then months as sub folders. If I go on a planned shoot to some sort of event or specific spot, I'll create a folder for that named 01_10 (Araluen Tulips) under the top level folder of the year, the 01_10 being the month and day in that order.

Presets:
I also made a user preset that I use on import that does the 'global' initial conservative adjustments that I know each image will need, like luminance for noise reduction, sharpening and detail, set clarity to about 25 along with vibrance, and saturation to about 9. The preset on import can also be turned off.

I usually then quickly run through the images one by one and manually adjust exposure, shadow/highlight so that it looks approximately correct.

Rating:
Now,  I could make a preset for every situation, like when shooting high ISO etc, but I don't need that. All I want is to have the imported images looking good enough for the next step, to enable rating them.

I have found myself many times almost discarding dud-looking images that proved to be not only salvageable, but turned out quite good, hidden by some exposure flaw like bright highlights, in need of cropping or over exposure. I have trouble evaluating the potential of an image unless it's been processed, hence the reason for giving them a quick run through in the Development module before I rate them and mark the 'keepers'.

I know a lot of people don't rate their images, but I found many uses for rating. When shooting, I usually shoot what I want multiple times with slight variations on composition and perspective, because sometimes a composition looks good in the viewfinder but not on the computer screen.

Rating during review in LR let's me quickly see what I liked the best, and I can also sort the entire folder in order of rating and many other criteria. It's an easy way to get your best work to the top of the grid of thumbnails, and the lower rated ones can be deleted as a group or whatever you want to do with them.

Final Adjustment:
Now it's time to go through the highest ranked and do the final processing touches, individually to suit each image. They say it doesn't really matter in what order things are done during processing other than doing the noise reduction and sharpening last, but I do like some order to my work.

My processing order:
Exposure
Clarity
Vibrance and Saturation
Curves
HSL (hue, saturation and luminance) on individual colours.
Detail (sharpening, detail, radius, luminance etc)

Just a note on using the Details panel. It often pays to use the 'masking' slider directly after luminance adjustment and prior to sharpening. If you hold down the shift+cmd+Left mouse button while dragging to the right, it masks what will not be sharpened with white and leaves the area to be sharpened as black.
This is handy because in areas of little detail, like sky, large shadow areas or water, artefacts can be created easily during sharpening, and this tool prevents that by only sharpening adjacent areas of high contrast, like edges and outlines etc, similar to the action of the Unsharp Mask in Photoshop.

Now, most of you will know, going gangbusters with any of these adjustments will give you artefacts and other nasties, so take it easy and check for artefacts after each step, it's difficult to tell what adjustment caused them if you just look at the end of all processing.

Spotting:
If for some reason the image has a lot of small unwanted details or spots from a dirty sensor etc, I tend to use Photoshop and the Spot healing brush tool, it does a much better job than LR and there are many related tools at the photog's disposal, including Content aware fill, which is indispensable for removing unwanted odds and ends seamlessly.

Flagging:
That sounds like about all there is, but I do one more thing, I use coloured flags to differentiate between images that have been;
Processed to finality. (green)
Exported to Jpeg. (blue)
Flagged for special treatment later (abstract or whatever) (red)

All the above sounds long winded and time consuming, but it's a lot faster doing it than writing about it.

Backup:
I keep a years worth of shots on my machine's hard disk which are backed up to an external drive a couple of times a month, also I don't delete the originals from the memory cards, at least until one back up has been done.
After my local drive has become a bit bloated, I move the folders and contents to a different external drive, as well as also copying them to my NAS, so that I can still access them over our local wifi network.

So I have a minimum of three copies of all my stuff, the local backup, the move to an external drive and on the NAS.


If anyone is interested, I subscribe to Adobe Creative Cloud and have Photoshop 2014 CC and Lightroom 5.7, all for the princely sum of AUD$9.99/month, the software is updated for free so I always have the latest versions.

I have no connection with Adobe by the way, I just like their products and especially this Creative Cloud plan.

(I could do without the slow loading web pages though Adobe!)


That's all there is, there ain't no more!